ASP.NET MVC (Not Core) in Windows Docker Container

Recently I’ve faced a task to dockerize legacy applications written in ASP.NET Core. Developers use IIS for the local development environment, but when a new teammate has to install the local environment, it takes ~8 hours to do all mumbo-jumbo to make everything works. So we decided to move the legacy application to docker, at least for the local development purpose at the beginning (aka “A Journey of a Thousand Miles Begins with a Single Step”).

Before I start, it is worth to mention, that I struggled to find a bit amount of info about containerizing ASP .Net Framework apps in Windows Containers. Almost all of the threads I’ve found were related to Linux Containers and .Net Core. So I’ve decided to share my own experience with such a task.

So the requirements after the dockerization were:

  • The application should still be hosted in IIS, due to internal app configuration
  • Changes in code files should be visible in the application with additional actions (except local build if needed)
  • Code should be debuggable
  • Deployed apps in containers should have custom hostnames
  • “One command run” process (instead of 8 hours of configuration)
  • Some apps use legacy AngularJS framework, with bower, etc. So Node Js should be available to use in containers
  • The Application should work 🙂

As a base, I’m going to use mcr.microsoft.com/windows/servercore/iis image, it is lighter than mcr.microsoft.com/dotnet/framework/aspnet image, so as smaller as better.

The code below downloads the nodejs distributive archive, next save it in image storage, unarchive to the folder and add this folder to the PATH variable. It will allow using node and npm command in the command line.. The last thing is the cleanup of the downloaded zip archive.

ADD https://nodejs.org/dist/v12.4.0/node-v12.4.0-win-x64.zip /nodejs.zip
RUN powershell -command Expand-Archive nodejs.zip -DestinationPath C:\; 
RUN powershell Rename-Item "C:\\node-v12.4.0-win-x64" c:\nodejs
RUN SETX PATH C:\nodejs
RUN del nodejs.zip

Next part of the code does the same, but here RemoteTools for Visual Studio is downloaded and installed, we will need it later for debugging.

ADD https://aka.ms/vs/16/release/RemoteTools.amd64ret.enu.exe /VS_RemoteTools.exe
RUN VS_RemoteTools.exe /install /quiet /norestart
RUN del VS_RemoteTools.exe

Now, as IIS should be used as a hosted server, we need to remove default content from inetpub\wwwroot folder. Later we will use this folder for own code.

RUN powershell -command Remove-Item -Recurse C:\inetpub\wwwroot\*

To be able to use ASP.NET application in IIS, we have to install Windows Feature by:

RUN powershell -command Install-WindowsFeature NET-Framework-45-ASPNET
RUN powershell -command Install-WindowsFeature Web-Asp-Net45

In order IIS to use content of inetpub\wwwroot folder, it is necessarry to add permission for access files. As we are using docker for development purposes and it is isolated, it is OK to grant everyone to access files by command:

RUN icacls "c:/inetpub/wwwroot" /grant "Everyone:(OI)(CI)M"

Now it is crucial to tell docker about our context:

WORKDIR /inetpub/wwwroot

Last, but not least, we have to run msvsmon.exe tool to allow remote debugging from Visual Studio. It is important to use as the lowest access restrictions as possible, just to omit to add exceptions to a firewall, auth issues, etc. (but remember that it is not enough for any kind of public access deployment option)

ENTRYPOINT ["C:\\Program Files\\Microsoft Visual Studio 16.0\\Common7\\IDE\\Remote Debugger\\x64\\msvsmon.exe", "/noauth", "/anyuser", "/silent", "/nostatus", "/noclrwarn", "/nosecuritywarn", "/nofirewallwarn", "/nowowwarn"]

The whole Dockerfile:

FROM mcr.microsoft.com/windows/servercore/iis

ADD https://nodejs.org/dist/v12.4.0/node-v12.4.0-win-x64.zip /nodejs.zip
RUN powershell -command Expand-Archive nodejs.zip -DestinationPath C:\; 
RUN powershell Rename-Item "C:\\node-v12.4.0-win-x64" c:\nodejs
RUN SETX PATH C:\nodejs
RUN del nodejs.zip

ADD https://aka.ms/vs/16/release/RemoteTools.amd64ret.enu.exe /VS_RemoteTools.exe
RUN VS_RemoteTools.exe /install /quiet /norestart
RUN del VS_RemoteTools.exe

RUN powershell -command Remove-Item -Recurse C:\inetpub\wwwroot\*
RUN powershell -command Install-WindowsFeature NET-Framework-45-ASPNET
RUN powershell -command Install-WindowsFeature Web-Asp-Net45

WORKDIR /inetpub/wwwroot

RUN icacls "c:/inetpub/wwwroot" /grant "Everyone:(OI)(CI)M"

ENTRYPOINT ["C:\\Program Files\\Microsoft Visual Studio 16.0\\Common7\\IDE\\Remote Debugger\\x64\\msvsmon.exe", "/noauth", "/anyuser", "/silent", "/nostatus", "/noclrwarn", "/nosecuritywarn", "/nofirewallwarn", "/nowowwarn"]

Obviously, we could run it file with docker run command, but let’s imagine we also need a create a database container for our application, so to fulfill the requirement of “One Command Run” I’ve created a docker-compose file

version: "3.8"

services:
  app:
    build: .
    image: samp.compose:latest
    ports:
      - "83:80"
      - "84:443"
    networks:
      app-network:
        ipv4_address: 10.5.0.5
    depends_on:
      - db
    hostname: samp
    
  db:
    image: microsoft/mssql-server-windows-express
    networks:
      - app-network
    ports:
      - "1433:1433"
    environment:
      - sa_password=test123
      - ACCEPT_EULA=Y
    hostname: dockerdb
    
networks:
  app-network:
    driver: nat
    ipam:
      config:
        - subnet: 10.5.0.0/16
          gateway: 10.5.0.1

As you can see, docker-compose file contains 2 services and 1 network, almost nothing special. But there are 2 things are worth to highlight:

  • Creating a network with an explicitly specified gateway and subnet. It will allow setting a predefined IP address for our containers (we will later use it for mapping to host). If you will not do that, then every time a container will be created, the new IP address will be automatically assigned from a pool of available IPs.
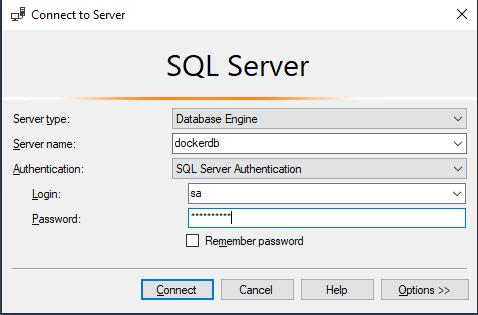
  • Using hostname in the db service. This allows us to use the hostname in the connection string outside of the container and app-network. For example, now it is possible to connect to this SQL server from your Windows machine using SSMS using the hostname as a Server name:

So now we could run our application just by command docker-compose up

Now just open the browser and put the IP from the docker-compose file (in my case 10.5.0.5) of app service and you should :

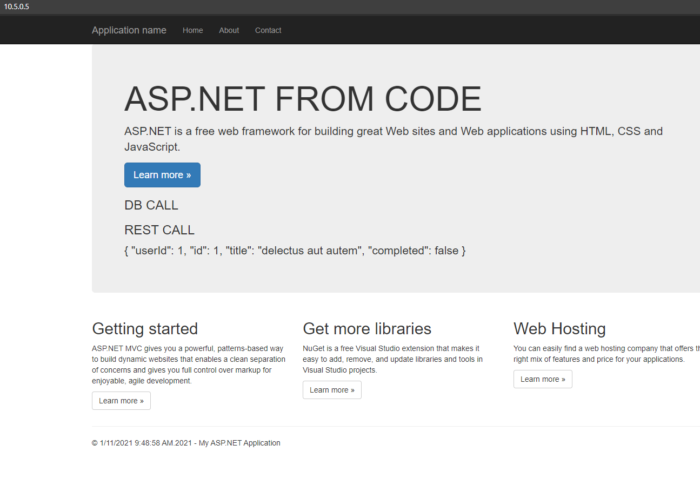
Now you could change your code and rebuild (if needed) the project on local machine to see changes on website.

Let’s check if our project has a nodejs installed (which potentially could be needed for some frontned build actions).

To do that, put the command docker ps and copy the container id of the app container:

Now put the command docker exec -it {YOUR CONTAINER ID} cmd. This command will connect to the container and run the cmd command. Now let’s just put node –version to check if nodejs is installed.

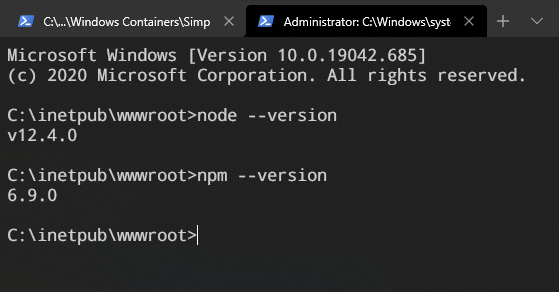
Node version is displayed, so now we could use it (together with npm) for further development

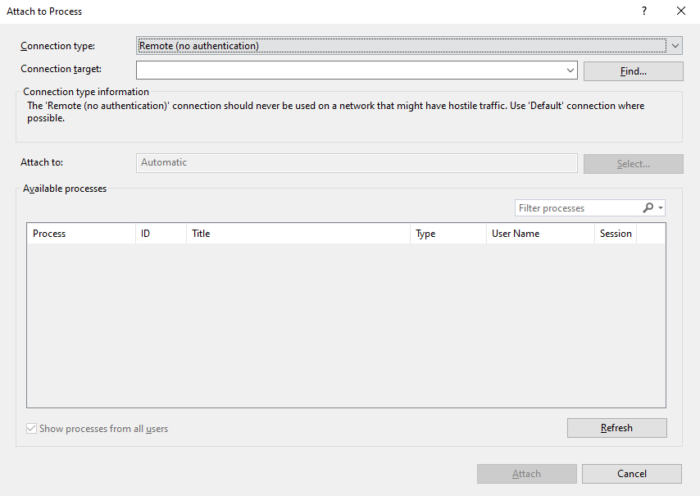
The next thing is debugging, as you remember we’ve added execution of msvsmon.exe as an entry point for our container. It allows us to use Visual Studio Remote Debugging. For that, just click Ctrl + Alt + P and select Remote (no authentication) and click the Find button:

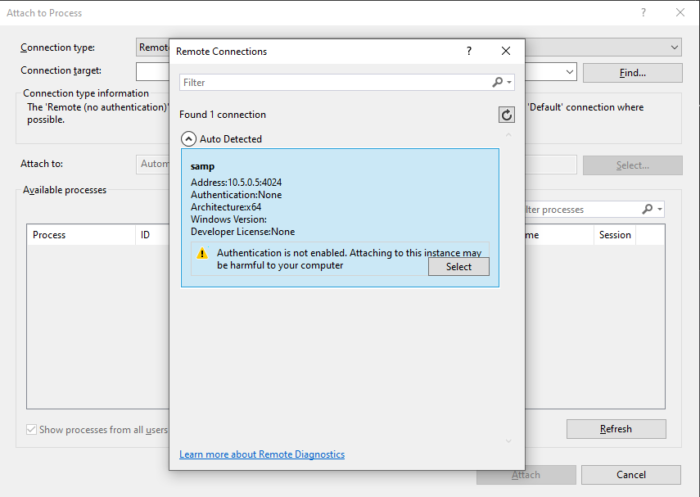
Next select created app from the list:

The last thing is to check Show processes for all users and select IIS process w3wp.exe. (You may need to open your website in browser to start the lazy IIS process)

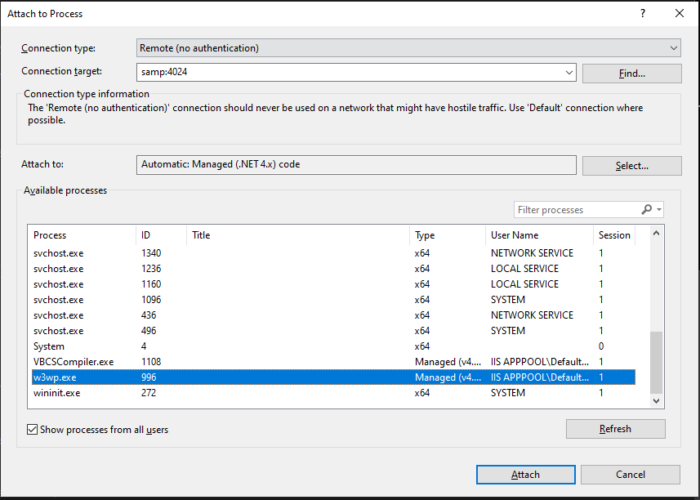
After VS attached to process, it is possible to use the regular debug experience.

The last requirement from the list is that applications in containers should run under hostname. To do that, we have to open C:\Windows\System32\drivers\etc\hosts file (you have to do that with admin rights) and append a line to the end and save the file.

10.5.0.5       samp.local.com

Where 10.5.0.5 is the IP from the docker-compose file, and samp.local.com is your custom hostname.

After that just open the browser (you may have to restart the browser and run ipconfig /flushdns command) and type http://samp.local.com

Link to the full codebase – in GitHub repository. You could find there an additional Dockerfile for the multistage build.

I hope this article could be helpful for people who are trying to migrate the legacy windows applications step by step to containerization.

DDD & CQRS & Event Sourcing. Part 3: Test Domain Model

Before we start, I recommend checking my previous post where I described designing a domain model with events and which benefits it brings for business and engineers.

Let’s start with the basic class for domain model, let’s call it Aggregate (you could find more about this keyword in DDD here):

public abstract class Aggregate
{
public Guid Id { get; private set; }
private readonly IList<object> _events = new List<object>();

public ICollection<object> DequeueEvents()
{
    var events = _events.ToList();
    _events.Clear();
    return events;
}

private void Enqueue(object @event)
{
    _events.Add(@event);
}

protected void Process(object @event)
{
    Type thisType = GetType();
    if (thisType == null) throw new NotSupportedException($"Current this type is null!");
    
    MethodInfo methodInfo = thisType.GetMethod("Apply",  BindingFlags.NonPublic | BindingFlags.Instance, Type.DefaultBinder, new [] { @event.GetType()}, null );
    if (methodInfo == null) throw new NotSupportedException($"Missing handler for event {@event.GetType().Name}");
    
    try
    {
        methodInfo.Invoke(this, new[] { @event } );
    }
    catch(TargetInvocationException ex)
    {
        ExceptionDispatchInfo.Capture(ex.InnerException).Throw();
    }
    Enqueue(@event);
}
}

As you could see, we have 3 main methods here:

  • Enqueue – simply add a new event to private event collection
  • Dequeue – returns the private event collection and clean the queue, so Aggregate event collection could not be changed in any way from outside.
  • Process – Try to find and call a proper method Apply (by method parameter type) and add anew event to the private event collection.

Also you could see private _events variable for storing events and Id property, which is common for every Aggregate object.

So our specific Aggregate will look like this:

public class User: Aggregate
{
public string Email { get; private set; }

public User(Guid id, string email) => Process(new Events.V1.UserCreated(userId:id, email: email ));

public void ChangeEmail(string userEmail) => Process(new Events.V1.UserEmailChanged(userId: Id, email: userEmail));

private void Apply(Events.V1.UserCreated @event)
{
    Id = @event.UserId;
    SetUserEmail(@event.Email);
}

private void Apply(Events.V1.UserEmailChanged @event) => SetUserEmail(@event.Email);

private void SetUserEmail(string email)
{
    email = email?.Trim();
    CheckNullOrEmpty(email, "Email");
    CheckMaxLength(50, email, "Email");
    CheckIsMatch(Constants.EmailTemplate, email, "Email");
    Email = email;
}
}

* For the simplicity of the example, I’ve omitted implementation details of methods CheckNullOrEmpty, CheckMaxLength, and CheckIsMatch. Anyway, if you are interested, you could find it in Github Repo here.

User domain model contains:

  • Email property (in addition to Id property from Aggregate class). Please be sure it has a private setter
  • SetUserEmail – a method for set and check if the email is correct
  • 2 private Apply methods for changing the internal state of the Domain Model
  • Public constructor
  • public ChangeEmail method for changing the email property

So when are speaking about the testing, we could check several things in the domain model:

  • It has a proper state – eg. User has not empty id and email
  • It generates a proper event – e.g. User generates UserCreated Event
  • Generated event has a proper state – UserCreated Event contains User Id and Email

Let’s see an example of such tests. I’m using Xunit, but you could use any test framework you like:

public class UserCreateTests
{
private readonly Domain.User _createdUser;
private readonly (Guid Id, string Password, string Email) _userData;

public UserCreateTests()
{
    _userData = (Id: Guid.NewGuid(), Password: "Testing123!", Email: "test@email.com");
}

[Fact]
public void ShouldBeCreatedWithCorrectData()
{
    Assert.NotNull(_createdUser);
    Assert.Equal(_userData.Id, _createdUser.Id);
    Assert.Equal(_userData.Email, _createdUser.Email);
}

[Fact]
public void ShouldGenerateUserCreatedEvent()
{
    var events = _createdUser.DequeueEvents();
    Assert.Single(events);
    Assert.Equal(typeof(Events.V1.UserCreated), events.Last().GetType());
}

[Fact]
public void UserCreatedEventShouldContainsCorrectData()
{
    var @event = (Events.V1.UserCreated) _createdUser.DequeueEvents().Last();
    Assert.Equal(_createdUser.Id, @event.UserId);
    Assert.Equal(_userData.Email, @event.Email);
}
}

Firstly, ShouldBeCreatedWithCorrectData checks if the User object is in a valid state after creation. Next, there are 2 tests for the events: ShouldGenerateUserCreatedEvent – checks if the event which has been generated has an expected type, and UserCreatedEventShouldContainsCorrectData checks if this event contains correct data.

As you could see, there is no big difference between unit testing regular objects, and those which are using Events for building their state. I hope this article helped you to understand better the philosophy of Event Sourcing. In the next post, I will describe the persistence of the aggregate using the Marten library. CU 🙂

The latest code base version of the project could be found on Github Org Page.

Always remember about IQueryable when using Expressions in LINQ!

Today I’ve faced unexpected behavior during querying data and JSON deserialization while playing with Marten library which uses PostgreSQL Database as storage. So let’s imagine we have a very dummy 2 classes, one for saving data (in JSON format) and one class for the projection (as a response of some Web API for instance):

Origin class for data storing:

public class User
{
    private User() { }

    public User(int id, string name)
    {
        Id = id;
        Name = name;
        Status = "Pending";
    }

    public int Id { get; private set; }
    public string Name { get; private set; }
    public string Status { get; private set; }
}

Projection class

public class ReadOnlyUser
{
    public string Name { get; set; }
    public string Status { get; set; }
}

So as you see, the User class has private setters and due to MSDN Deserialization behavior, JSON Serializer ignores read-only properties. This means that this code will always create a User instance with Status Pending

var stringData = "{\"Id\": \"1\", \"Status\": \"Active\",\"Name\": \"John\"}";

var stream = new MemoryStream(Encoding.ASCII.GetBytes(stringData));
var textReader = new JsonTextReader(new StreamReader(stream));

var user = new JsonSerializer().Deserialize<User>(textReader);
Result: 

Output object:
User Id: 1 
User Name: John 
User Status: Pending

So if we follow the example above, making a projection from such class, will produce the ReadOnlyUser which also will have a Status Pending:

 var stringArrayData = "[{\"Id\": \"1\", \"Status\": \"Active\",\"Name\": \"John\"}]";
 JsonSerializer serializer = new JsonSerializer();

 var stream = new MemoryStream(Encoding.ASCII.GetBytes(stringArrayData));
 var reader = new JsonTextReader(new StreamReader(stream));

 var user = serializer
   .Deserialize<IEnumerable<User>>(reader)
   .Where(usr => usr.Id == "1")
   .Select(usr => new ReadOnlyUser {Name=usr.Name, Status=usr.Status})
   .FirstOrDefault();

 Console.WriteLine($"\r\nOutput object:\r\nUser Name: {user.Name} \r\nUser Status: {user.Status}");
Result:

Output object:
User Name: John 
User Status: Pending

But what if we are not querying from a string variable, but rather from the database? Most probably instead of IEnumerable, IQueryable interface will be used.

In a nutshell, IQueryable brings 1 huge benefit – it knows how to execute expressions on special data sources. (For instance Where statement will be implemented in the database, not on the memory side)

So, coming back to the previous example, this code will also return User with Status Pending, won’t it?

return await _session.Query<User>() //Returns IQueryable<User> from db
   .Where(usr => usr.Id == "1")
   .Select(usr => new ReadOnlyUser {Name=usr.Name, Status=usr.Status})
   .FirstOrDefaultAsync();
Result:

Output object:
User Name: John 
User Status: Active
Me at that moment

So how did it happen, why Status is Active if the User has a private setter on that field?

In the first example, as we used IEnumerable, all of the operations are processed in our App memory. The order of commands was like that:

  1. Deserialize the JSON to IEnumerable list of Users (by using the only 1 public constructor which set Status to Pending without possibility to set it to Active because of private setter)
  2. Use Where statement to filter the Users with Id = “1”
  3. Use the Select projection for creating a new ReadOnlyUser

In the example with an IQueryable interface, steps 1 and 2 were “outsourced” to the database. So commands look so:

  1. Find by Object Type a proper table from which data should be fetched and create a query like “Select * from User”
  2. Add Where the statement “Where Id = ‘1’ ” to the query from step 1
  3. Execute a query in the database and return the result as a JSON object
  4. Use JsonSerializer for deserialization from JSON to ReadOnlyUser

So as you see, in the second scenario, many steps executed on the database side, but in that particular case, we gain even more profit because we could omit the limitation of Newtonsoft.Json of ignoring read-only fields during deserialization. In fact, we are not creating a User object but just go directly to the creation of ReadOnlyUser projection.

Please be aware, that every implementation of an IQueryable interface has its own rules of converting command and using expression tree. So before relying on “outsourcing processing”, just spend a few minutes to check what exactly will be executed.